
This will be my first how-to post and hopefully not my last.
Today I am going to show how you can add a logo to the nadir of a photosphere. This is something I have been trying to figure out how to do for a while now and could not find an easy how to until I stumbled across Edit zenith and nadir in one go with PTGui from PANOTools.org. While the process described in the article from PANOTools.org was easy to follow since it does not focus on either the nadir or zenith it is actually a little difficult to properly position your logo and you may end up with it just a little off-center. I have taken the process and modified it to only edit the nadir making it easier to position your logo.
First off it helps to know what the nadir and zenith are; The nadir is the bottom point of the sphere, this should be the place below your feet or tripod when you are taking the pictures. The zenith is the top point of the sphere or the place directly above you when you take the pictures.
There are a few reasons you may want to edit either the nadir or zenith of the sphere which may include; wanting to add a log, you did not point your camera high or low enough and ended up with holes in your sphere, you have parallax issues at the nadir, or many other things. No matter what your reason I hope this process helps you out.
What you needed:
PTGui
Adobe Photoshop (I use CS6 but PSE should also work)
A complete equarectangulir photosphere
A logo to use as a nadir patch
These are both paid programs but you should be able to do the same process with open source software such as Hugin and GIMP, I will try to do another post later showing how to do this with open source.
Prepare your sphere for editing in Photoshop
TIP: You should create your sphere in PTGui as a TIFF using the maximum resolution possible as this will help you get a better result.
You will need to have PTGui in advanced mode which can be accessed by clicking the Advanced button in the top right corner of the project assistant tab.
- Start a new project in PTGui and import a completed sphere as your source image

- If you have not already done so click on the Advanced button now to switch to advanced view

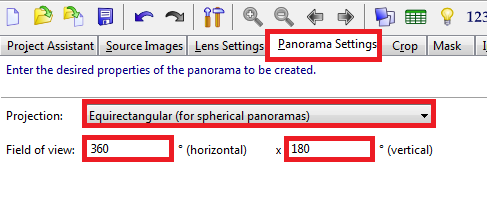
- Go to the Panorama Settings tab (If you don’t see it you did not click Advanced yet) and set the following

- Projection: Equirectangular
- Field of view: 360 x 180
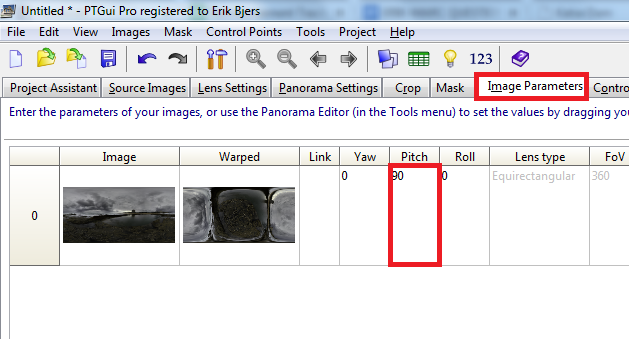
- Go to the Image Parameters tab and set the pitch to 90. This will rotate the image so that the nadir is in the middle and relatively flat allowing you to past a logo. TIP: If you want to edit the zenith use -90 instead of 90

- Head on over to the Create Panorama tab and

- Click Set optimum size and set it to the maximum size for the best quality
- Set the output to TIFF
- Click Create Panorama


We are now ready to edit in Photoshop and add a logo.
Edit the sphere in Photoshop
- Open up Photoshop and open both the sphere you just created and your logo
- Past your logo onto your sphere.
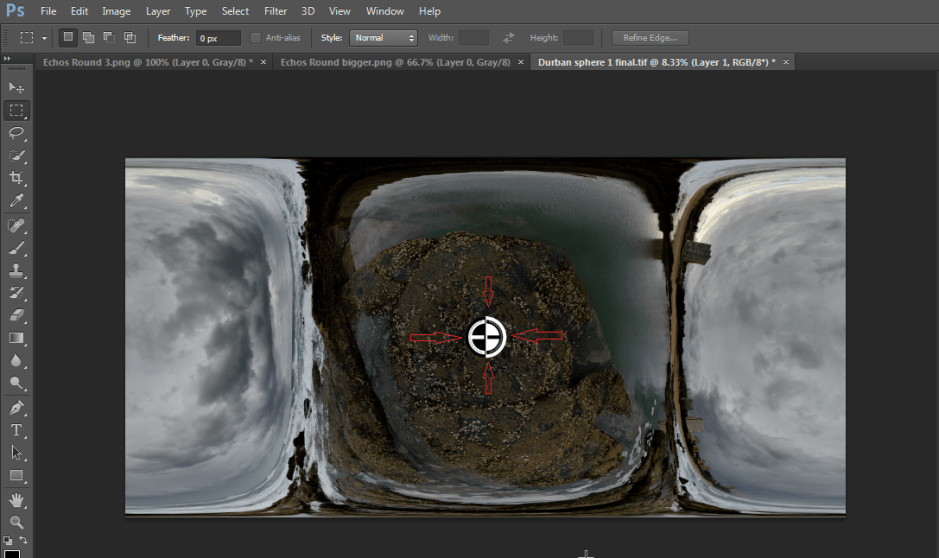 TIP: If you are using CS it should paste the logo into the center of the sphere which is where you want it, if you are using PSE or GIMP you may have to re position it.
TIP: If your logo does not appear to be the right size it is best to delete it and re-size it in the logo file then re-past it into the sphere
TIP: Your logo should be circular and use transparency - Save your image as a TIFF
TIP: If you keep the layers it will be easier to edit later but you can flatten the image if you wish to save space

Now you need to edit the sphere again in PTGui to correct the orientation.
Correct the Orientation in PTGui
- Start a new project in PTGui and load the sphere with your logo as the source image
- If you have not already done so click on the Advanced button now to switch to advanced view
- Go to the Panorama Settings tab (If you don’t see it you did not click Advanced yet) and set the following
- Projection: Equirectangular
- Field of view: 360 x 180
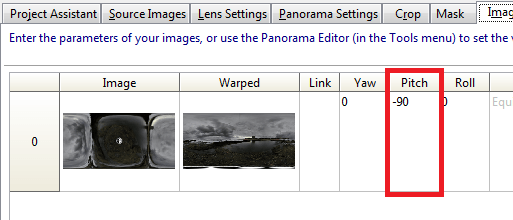
- Go to the Image Parameters tab and set the pitch to -90. This will rotate the image so that the nadir is in the middle and relatively flat allowing you to past a logo. TIP: If you used -90 earlier to add a zenith logo then you would set the pitch to 90
- Create your panorama using the output settings of your choice

You have now added your logo or other nadir patch to your sphere, upload to the site of your choice and enjoy.
If you don’t have a logo yet I do some freelance logo design and can create a simple logo for a small fee, the actual fee will depend on the amount of work that is required. I created the logo used in this post as well as the ECHO logo on my page. If you are interested please use the contact page to send me an email.
Sadly wordpress will not let me embed a sphere from 360cities.com so I can only show the flat image in this post. Just click on the below image to see the complete sphere with the logo.
![]()

Ah… now I understand how you do it! Great explanation, and a useful tip.
LikeLike
Hello, just wanted to tell you, I enjoyed this post.
It was helpful. Keep on posting!
LikeLiked by 1 person
Glad you found it useful
LikeLike
Great post Erik, it was very helpful – thank you and well done!
LikeLike
Hello Erik…Any pointers on how to make the logo less pixelated? I have created my logo and put in my pano, but look here:
https://plus.google.com/photos/100566367816360864681/albums/6110514381065968769?authkey=CKftr7G-k_eUtgE
Thanks
LikeLike
Your first issue is the Google+ viewer, it is not very good and introduces distortion in spheres. Try sharing it on
https://www.google.com/maps/views/?gl=us
http://round.me
http://360cities.net
These sites all have much better viewers and on 360 Cities you can upload much higher resolution spheres.
Next it may be the size, what size is your logo and how much do you have to enlarge it when you insert it?
If you are using photo shop you can try opening your logo as a smart object as this allows for better resizing.
LikeLike
I have a couple of questions…I just want to do a logo on nadir
1. Do you set all images at 90 pitch or just image 0?
2. Do you optimize before creating the pano?
3. Once you’ve added the logo in Photoshop and saved the .tiff how do you get a final correctly “pitched” pano with logo?
thanks
LikeLike
Hello Kelly,
Sorry it took me so long to reply I never got an alert of your comment…
1) I stitch the panorama using all the source images then I create a new project using just the finished panorama so there is only one image to rotate
2) I usually don’t run optimize unless I have a problem I am trying to fix
3) Start a new project in your pano software, load the tiff you created in PS as a single image, set the pitch to -90 and stitch it again. This will rotate it back to the normal orientation
LikeLike